TechShiksha Weekend Project. Build Your Rubber Band Powered Car.
Build It Yourself.
Rubber Band Car
YOUR CHALLENGE
Build a car that goes really far, really fast. Oh, by the way, your power source is a rubber band, and your car can only have two wheels. Start your engines!
MATERIALS (PER CAR)
-
5 x 6—inch piece of corrugated cardboard (cut so the holes from the corrugation are visible along the long edge)
-
Ruler
-
Scissors
-
1 wooden skewer (Use the thinnest available skewers. These probably will be 1/8 of an inch thick.)
-
Tape (masking or duct)
-
2 faucet washers (Size: 1/4—inch Large)
-
2 CDs
-
Poster putty (1/4 package)
-
1 rubber band
-
Pencils, pens, or markers
BUILD
1. Notch the body.
Cut a notch in the center of the five—inch side of the cardboard. Make the notch 2 inches wide and 1 1/2—inches deep. Throw away the piece you’ve cut out.
2. Make the axle.
Slide the skewer through the cardboard, close to the outer edge. Make sure the axle sticks out the same amount from each side of the body. When we made ours, the skewer didn’t always rotate freely. If this happens to you, twist it until the opening stretches.
3. Modify the axle.
Find where the skewer goes across the notch. In the middle of this section, wrap a small piece of tape to make a “catch” for the rubber band. Try twisting the tape that is sticking up to make sure the catch is thick enough to hold the rubber band.
4. Assemble the wheels.
Hold a washer in the center hole of a CD. Slide the washer and CD onto the axle, leaving lots of room between the CD and cardboard. Put poster putty on each side of the washer to join the CD, washer, and axle tightly together—REALLY TIGHTLY. The wheel and axle should now rotate together. Make the second wheel the same way.
5. Attach the rubber band.
Tape one end of a rubber band to the cardboard at the end opposite the axle.
6. Power your car.
Wrap the unattached end of the rubber band over the catch. Turn the axle several times. You’ve given the rubber band potential (stored) energy. When it unwinds, this potential energy is transformed into kinetic (motion) energy, and the axle spins. The more you wind the rubber band, the more energy is available for your car’s wheels—and the farther and faster your car goes.
TEST
It’s off to the races. Set your car on the floor, rubber band side down. What happens when you let your car go? When we made ours, our wheels didn’t always turn freely. If this happens to you, make sure the catch isn’t hitting the cardboard when the axle spins. Also, check to make sure the rubber band isn’t jamming itself against the cardboard. We found that wrapping the rubber band more carefully usually solved the problem, but you can also create more space for the rubber band by making the notch just a little wider.
REDESIGN
You’ve just built a prototype, which is an early version of a product. Prototypes help engineers understand a product’s strengths and weaknesses and how it might be improved. Thinking about your car, try to come up with some ways to make it perform even better. You can also redesign it for new challenges, like making it work on sand or thick carpet. Brainstorm ideas, revise your design, and then build and test it.
INSIDE THE ENGINEERING
Your car is powered by a rubber band, but most cars use gasoline. The average car gets around 20 miles per gallon, but gasoline is an expensive, limited source of energy that pollutes. Many people want an alternative fuel source that is more affordable, more efficient, and more environmentally friendly. In 2006, two engineering students created the MIT Vehicle Design Summit—challenging students from around the world to build cars that didn’t use gasoline and could get the equivalent of 500 miles per gallon… and they did it! One car used a hydrogen fuel cell (a device that converts hydrogen and oxygen into electricity.) Another combined human power and solar power, while a third was entirely electric. A fourth car used biodiesel, an environmentally friendly fuel that can be made from grass, corn, or soybeans. Today you’re working with rubber bands, but tomorrow, who knows!
Theo Jansen Mechanism for Walking structures
the complex movement can be understood by seeing this simulation.
Theo jensen’s creations.. (Walking animals )
TechShiksha Weekend Project Build Your own Steam Engine
TechShiksha Science Club Weekend project
 Build Your own Steam Engine this Weekend
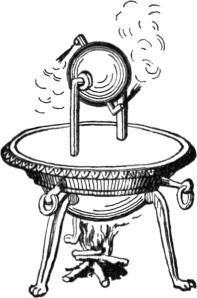
Introduction: Engines have always fascinated us. We all know that James Watt invented the Steam Engine. But do you know “the first ever built Steam Engine is Hero’s Engine built by Heros 1000 years before James Watt steam Engine. Hero is the same guy who invented hero’s formula in maths that we learn in High school.
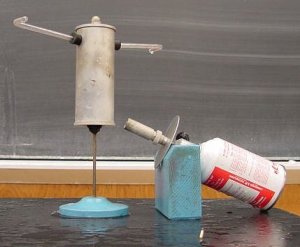
Let’s build a Hero’s Engine(Aelopile) using Cold drink Can.
Materials required: 12 cm long cylindrical metallic container with airtight cap, nails, Brass or any metal tubes (smallest in Diameter that you can get), tripod stand, Glue Gun, Soldering Iron
Step 1: Punch two holes 2cm from the top on opposite sides of the cylinder.
Step 2: Take the two 4 cm brass tubes, fold them at 1cm length from an end using pliers to get L shape.
Step 3: Fit the two brass tubes at the two holes of cylinder with L end facing outwards. Solder it or use glue gun or M seal to fix and seal it properly. The L shape of the tubes should face opposite to each other.
Step 4: Fill 2/3rd of the container with water.
Step 5: Fix a ring , or a hook or an attachment to the lid of the container using Soldering Iron or Glue Gun. Tie a strong thread and hang the whole system on a Tripod stand.
Step 6: Burn candles or a lamp below the cylinder and see your engine start pumping steam from the tubes and rotate.
Hello world!
Welcome to WordPress.com. This is your first post. Edit or delete it and start blogging!
